Xamarin.Forms 创建移动应用程序的基础知识 12 - 访问URL数据
简介
演示如何访问并将使用网络数据。
- 添加 Newtonsoft.Json。
- 创建访问业务。
- 使用访问数据。
Newtonsoft.Json 类库引用
- 管理 NuGet 包。
- 搜索 Newtonsoft.Json。
- 安装推荐版本。
创建访问业务
- 添加 TianQiModel.cs 到 Models 文件夹。
- 编辑 TianQiModel.cs:
using Newtonsoft.Json;
using System;

namespace AwesomeApp.Models
{
	/// <summary>
	/// 天气数据模型
	/// </summary>
	public class TianQiModel
	{
		/// <summary>
		/// 城市ID
		/// </summary>
		[JsonProperty("cityid")]
		public string CityID { get; set; }

		/// <summary>
		/// 城市名称
		/// </summary>
		[JsonProperty("city")]
		public string City { get; set; }

		……

		/// <summary>
		/// 警报
		/// </summary>
		[JsonProperty("alarm")]
		public AlarmModel Alarm { get; set; }
	}

	/// <summary>
	/// 警报数据模型
	/// </summary>
	public class AlarmModel
	{
		/// <summary>
		/// 类型
		/// </summary>
		[JsonProperty("alarm_type")]
		public string Type { get; set; }

		/// <summary>
		/// 等级
		/// </summary>
		[JsonProperty("alarm_level")]
		public string Level { get; set; }

		/// <summary>
		/// 内容
		/// </summary>
		[JsonProperty("alarm_content")]
		public string Content { get; set; }
	}
}
- JsonProperty 属性标签表示 JSON 数据名称
- 添加 TianQiAPI.cs 到 APIs 文件夹。
- 编辑 TianQiAPI.cs:
using AwesomeApp.Models;
using Newtonsoft.Json;
using System;
using System.Diagnostics;
using System.Net.Http;
using System.Threading.Tasks;

namespace AwesomeApp.APIs
{
	public class TianQiAPI
	{
		private const string _api_url = "https://www.tianqiapi.com/api";
		private const string _api_version = "v6";
		private const string _api_appid = "YOUR_APPID";
		private const string _api_appsecret = "YOUR_SECRET";
		private readonly HttpClient _client;

		public TianQiAPI()
		{
			_client = new HttpClient();
		}

		public async Task<TianQiModel> GetWeatherDataAsync()
		{
			TianQiModel tianQiData = null;
			try
			{
				using (HttpResponseMessage response = await _client.GetAsync(string.Format(
					"{0}?version={1}&appid={2}&appsecret={3}",
					_api_url, _api_version, _api_appid, _api_appsecret)))
				{
					if (response.IsSuccessStatusCode)
					{
						string content = await response.Content.ReadAsStringAsync();
						tianQiData = JsonConvert.DeserializeObject<TianQiModel>(content);
					}
					else
					{
						Debug.WriteLine("\tERROR {0}", response.Content);
					}
				}
			}
			catch (Exception ex)
			{
				Debug.WriteLine("\tERROR {0}", ex.Message);
			}

			return tianQiData;
		}
	}
}
APPID 与 SECRET 到 https://www.tianqiapi.com 申请
使用访问数据
- 添加 TitleAndTextCell.xaml 单元格控件到 Controls。
- 编辑 TitleAndTextCell.xaml:
<?xml version="1.0" encoding="UTF-8"?>
<ViewCell xmlns="http://xamarin.com/schemas/2014/forms"
             xmlns:x="http://schemas.microsoft.com/winfx/2009/xaml"
             xmlns:d="http://xamarin.com/schemas/2014/forms/design"
             xmlns:mc="http://schemas.openxmlformats.org/markup-compatibility/2006"
             mc:Ignorable="d"
             x:Class="AwesomeApp.Controls.TitleAndTextCell">
	<ViewCell.View>
		<Grid x:Name="grid">
			<Grid.ColumnDefinitions>
				<ColumnDefinition Width="Auto" />
				<ColumnDefinition Width="*" />
			</Grid.ColumnDefinitions>
		</Grid>
	</ViewCell.View>
</ViewCell>- 编辑 TitleAndTextCell.xaml.cs:
using System.Collections.Generic;

using Xamarin.Forms;
using Xamarin.Forms.Xaml;

namespace AwesomeApp.Controls
{
	[XamlCompilation(XamlCompilationOptions.Compile)]
	public partial class TitleAndTextCell : ViewCell
	{
		public List<string> TitleClass { get; set; }

		public string TitleText { get; set; }

		public List<string> TextClass { get; set; }

		public string TextBindingPath { get; set; }

		public TitleAndTextCell(List<string> titleClass, string titleText, List<string> textClass, string textBindingPath)
		{
			InitializeComponent();

			TitleClass = titleClass;
			TitleText = titleText;
			TextClass = textClass;
			TextBindingPath = textBindingPath;

			InitGrid();
		}

		private void InitGrid()
		{
			grid.Children.Clear();
			grid.Children.Add(new Label { StyleClass = TitleClass, Text = TitleText });
			Label content = new Label { StyleClass = TextClass };
			content.SetBinding(Label.TextProperty, TextBindingPath);
			grid.Children.Add(content, 1, 0);
		}
	}
}- 添加 TianQiAPIPage.xaml。
- 编辑 TianQiAPIPage.xaml:
<?xml version="1.0" encoding="utf-8" ?>
<ContentPage xmlns="http://xamarin.com/schemas/2014/forms"
             xmlns:x="http://schemas.microsoft.com/winfx/2009/xaml"
             xmlns:d="http://xamarin.com/schemas/2014/forms/design"
             xmlns:mc="http://schemas.openxmlformats.org/markup-compatibility/2006"
			 xmlns:col="clr-namespace:AwesomeApp.Controls;assembly=AwesomeApp"
             mc:Ignorable="d"
             x:Class="AwesomeApp.TianQiAPIPage">
	<ContentPage.Resources>
		<ResourceDictionary>
			<Style TargetType="StackLayout">
				<Setter Property="Orientation" Value="Horizontal" />
				<Setter Property="Margin" Value="15,0" />
			</Style>
			<Style TargetType="Grid">
				<Setter Property="Margin" Value="15,0" />
			</Style>
			<Style TargetType="Label" Class="title">
				<Setter Property="HeightRequest" Value="60" />
				<Setter Property="WidthRequest" Value="80" />
				<Setter Property="TextColor" Value="Black" />
				<Setter Property="VerticalTextAlignment" Value="Center" />
			</Style>
			<Style TargetType="Label" Class="text">
				<Setter Property="TextColor" Value="DimGray" />
				<Setter Property="VerticalOptions" Value="CenterAndExpand" />
				<Setter Property="HorizontalOptions" Value="FillAndExpand" />
				<Setter Property="LineBreakMode" Value="WordWrap" />
			</Style>
		</ResourceDictionary>
	</ContentPage.Resources>
	<ContentPage.Content>
		<TableView x:Name="tableView" Intent="Settings" HasUnevenRows="True"></TableView>
	</ContentPage.Content>
</ContentPage>- 编辑 TianQiAPIPage.xaml.cs:
using AwesomeApp.APIs;
using AwesomeApp.Controls;
using AwesomeApp.Models;
using System.Collections.Generic;
using Xamarin.Forms;
using Xamarin.Forms.Xaml;

namespace AwesomeApp
{
	[XamlCompilation(XamlCompilationOptions.Compile)]
	public partial class TianQiAPIPage : ContentPage
	{
		public TianQiAPIPage()
		{
			InitializeComponent();

			Init();
		}

		private void Init()
		{
			tableView.Root = new TableRoot
			{
				new TableSection("实时天气预报")
				{
					CreateTableViewViewCell("城市ID", "CityID"),
					CreateTableViewViewCell("城市", "City"),
					CreateTableViewViewCell("城市英文", "CityEn"),
					CreateTableViewViewCell("国家", "Country"),
					CreateTableViewViewCell("国家英文", "CountryEn"),
					CreateTableViewViewCell("日期", "Date"),
					CreateTableViewViewCell("星期", "Week"),
					CreateTableViewViewCell("更新时间", "UpdateTime"),
					CreateTableViewViewCell("天气", "Weather"),
					CreateTableViewViewCell("天气图标", "WeatherImage"),
					CreateTableViewViewCell("温度", "Temperature"),
					CreateTableViewViewCell("高温", "TemperatureHigh"),
					CreateTableViewViewCell("低温", "TemperatureLow"),
					CreateTableViewViewCell("风向", "Wind"),
					CreateTableViewViewCell("风力", "WindSpeed"),
					CreateTableViewViewCell("风速", "WindMeter"),
					CreateTableViewViewCell("湿度", "Humidity"),
					CreateTableViewViewCell("能见度", "Visibility"),
					CreateTableViewViewCell("气压hPa", "Pressure"),
					CreateTableViewViewCell("空气质量", "Air"),
					CreateTableViewViewCell("PM2.5", "AirPM25"),
					CreateTableViewViewCell("空气等级", "AirLevel"),
					CreateTableViewViewCell("空气质量", "AirTips"),
					CreateTableViewViewCell("警报类型", "Alarm.Type"),
					CreateTableViewViewCell("警报等级", "Alarm.Level"),
					CreateTableViewViewCell("警报内容", "Alarm.Content"),
				}
			};
		}

		private TitleAndTextCell CreateTableViewViewCell(string text, string bindingPath)
		{
			return new TitleAndTextCell(new List<string> { "title" }, text, new List<string> { "text" }, bindingPath);
		}

		protected override async void OnAppearing()
		{
			base.OnAppearing();

			TianQiModel tianQi = await TianQiAPI.GetWeatherDataAsync(string.Empty);
			BindingContext = tianQi;
		}
	}
}- 编辑 App.xaml.cs:
public App()
{
InitializeComponent();
MainPage = new TianQiAPIPage();
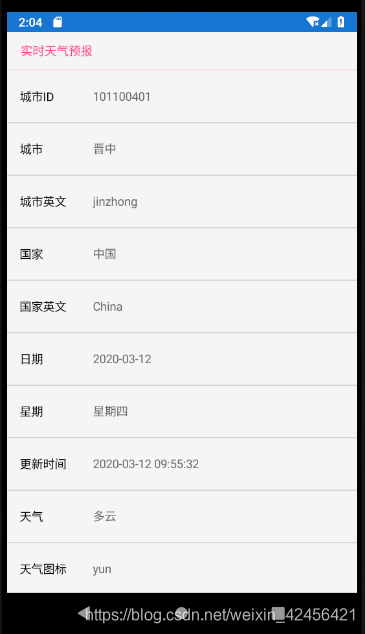
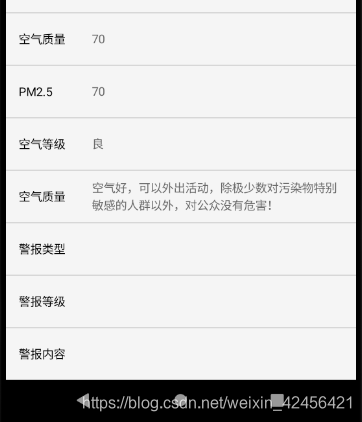
}- 调试界面:
![]()
![]()
![]()